指定したフォルダー内の画像をスライド形式で表示させるには:2カ月で160本作った還暦開発者が送る10のアプリ開発ノウハウ(5)(1/2 ページ)
古(いにしえ)からのVBでWindows 8.1向けのさまざまな機能のアプリを開発する手順やコツを解説していく。今回は、指定したフォルダー内の画像を順次スライドさせながら表示させる方法をサンプルを交えて解説する。
前回の「Facebook SDK for .NETを使い、アプリから画像をFacebookに投稿させるには」に続き、VBで、Windows 8.1アプリを開発する手順を解説する。今回のサンプルは、表示させたい画像のあるフォルダーを指定(図1)して、そのフォルダー内の画像を「→(次)」アイコン、「←(前)」アイコンタップで順次スライドさせながら表示させるサンプルだ(図2)。表示可能な画像は「.png」「.jpg」ファイル形式だ。

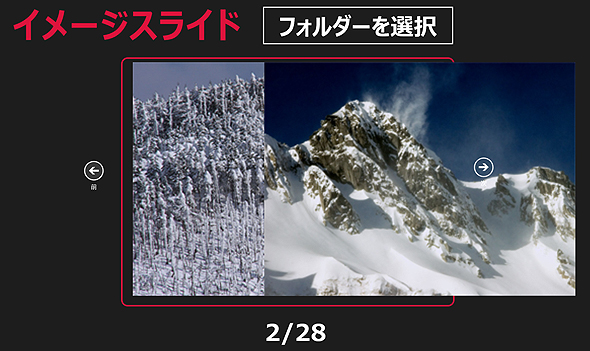 図2 「←(前)」「→(次)」アイコンをタップすると順次画像がスライドして表示される
今回のサンプルプログラムは下記のURLからダウンロードできる。
プロジェクトの作成
Visual Studio(以下、VS) 2013のメニューから[ファイル(F)]→[新規作成(N)]→[プロジェクト(P)]と選択する。
次に、[テンプレート]から[Windows ストア]を選択し、右に表示される項目名から[新しいアプリケーション(XAML)]を選択する。[名前(N)]に任意のプロジェクト名を指定する。ここでは「ImageSlide.xaml」という名前を付けている。
コントロールのレイアウト(MainPage.xaml)
ツールボックスからデザイン画面上にコントロールをレイアウトする。書き出されるXAMLは下記のようになる。
<Page
    x:Class="ImageSlide.MainPage"
    xmlns="http://schemas.microsoft.com/winfx/2006/xaml/presentation"
    xmlns:x="http://schemas.microsoft.com/winfx/2006/xaml"
    xmlns:local="using:ImageSlide"
    xmlns:d="http://schemas.microsoft.com/expression/blend/2008"
    xmlns:mc="http://schemas.openxmlformats.org/markup-compatibility/2006"
    mc:Ignorable="d">
    <Viewbox>■(1)
        <Grid Background="{StaticResource ApplicationPageBackgroundThemeBrush}" Width="1366">
        <Button x:Name="folderSelectButton" Content="フォルダーを選択" HorizontalAlignment="Left" Height="83" Margin="541,18,0,0" VerticalAlignment="Top" Width="397" FontFamily="Meiryo UI" FontSize="48"/>■(2)
        <Border BorderBrush="Crimson" BorderThickness="3" HorizontalAlignment="Left" Height="512" Margin="252,125,0,0" VerticalAlignment="Top" Width="686" CornerRadius="12">■(3)
            <Grid>■(3)
                <Image x:Name="Image1" HorizontalAlignment="Left" Height="480" Margin="21,7,0,0" VerticalAlignment="Top" Width="640" Stretch="UniformToFill">■(3)
                    <Image.RenderTransform>■(3)
                        <TranslateTransform/>■(3)
                    </Image.RenderTransform>■(3)
                </Image>■(3)
                <Image x:Name="Image2" HorizontalAlignment="Left" Height="480" Margin="21,7,0,0" VerticalAlignment="Top" Width="640" Stretch="UniformToFill">■(3)
                    <Image.RenderTransform>■(3)
                        <TranslateTransform/>■(3)
                    </Image.RenderTransform>■(3)
                </Image>■(3)
            </Grid>■(3)
        </Border>■(3)
        <AppBarButton x:Name="prevButton" HorizontalAlignment="Left" Height="93" Label="前" Margin="145,324,0,0" VerticalAlignment="Top" Width="102" Icon="Back" IsEnabled="False"/>■(4)
        <AppBarButton x:Name="nextButton" HorizontalAlignment="Left" Height="93" Label="次" Margin="943,317,0,0" VerticalAlignment="Top" Width="109" Icon="Forward"/>■(4)
        <TextBlock HorizontalAlignment="Left" Height="91" Margin="28,10,0,0" TextWrapping="Wrap" Text="イメージスライド" VerticalAlignment="Top" Width="491" FontFamily="Meiryo UI" FontSize="72" FontWeight="Bold" Foreground="Crimson"/>■(5)
        <TextBlock x:Name="countTextBlock" HorizontalAlignment="Left" Height="86" Margin="397,657,0,0" TextWrapping="Wrap"  VerticalAlignment="Top" Width="428" FontFamily="Meiryo UI" FontSize="48" FontWeight="Bold" TextAlignment="Center"/>■(6)
    </Grid>■(3)
    </Viewbox>■(1)
</Page>
以上、全てをレイアウトしたのが図3だ。
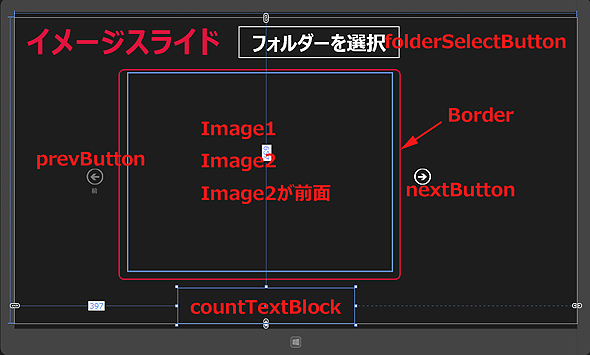 図3 各コントロールを配置した
以降は、ソースコードに割り振った番号ごとに詳細に見ていこう。
(1)
Grid要素全体をViewBox要素で囲む。ViewBox要素は、伸縮およびスケーリングを実行して単一の子を使用可能な領域全体に引き伸ばすことができるコンテンツ・デコレータを定義する。
(2)
名前が「folderSelectButton」というButton要素を1個配置する。
(3)
Border要素を配置し、枠線の色(BorderBrush)に「Crimson」、枠線の幅(BorderThickness)に「3」、四隅を丸める(CornerRadius)ために「12」を指定している。その子要素として
各Image要素には、Image.RenderTransformプロパティ要素を配置し、子要素としてTranslateTransform要素を配置している。TranslateTransform要素は、「2次元X、Y座標系」内のオブジェクトを移動する要素で、Image.RenderTransformプロパティ要素内に記述する必要がある。
(4)
次に、2つのAppBarButton要素を配置する。「←(前)」「→(次)」アイコンに該当するボタンだ。プロパティからSymbolに「Back」「Forward」を指定する。Labelには「前」「次」と指定する。
(5)
タイトルを表示するTextBlock要素を配置する。
(6)
「何枚目中何枚目の画像を表示中か」を表す、名前が「countTextBlock」というTextBlock要素を配置する。
Copyright © ITmedia, Inc. All Rights Reserved.


![]() ITmediaはアイティメディア株式会社の登録商標です。
ITmediaはアイティメディア株式会社の登録商標です。