Webカメラで撮影した画像に音声コメントを付けて保存・再生するには:2カ月で160本作った還暦開発者が送る10のアプリ開発ノウハウ(6)(2/4 ページ)
コントロールのレイアウト(MainPage.xaml)
ツールボックスからデザイン画面上にコントロールをレイアウトする。書き出されるXAMLは下記のようになる。
<Page
    xmlns="http://schemas.microsoft.com/winfx/2006/xaml/presentation"
    xmlns:x="http://schemas.microsoft.com/winfx/2006/xaml"
    xmlns:local="using:ImageVoiceRecorde"
    xmlns:d="http://schemas.microsoft.com/expression/blend/2008"
    xmlns:mc="http://schemas.openxmlformats.org/markup-compatibility/2006"
     x:Class="ImageVoiceRecorde.MainPage"
    mc:Ignorable="d">
    <Viewbox>■(1)
        <Grid Background="Blue" Width="1545" >
        <StackPanel  Margin="706,100,0,0">■(2)
            <Canvas x:Name="PhotoArea" Margin="10,51,19,237" Width="640" Height="480"/>■(3)
            <ProgressRing HorizontalAlignment="Left" Height="77"  Margin="300,-500,29,237" VerticalAlignment="Top" Width="117" IsActive="False" IsEnabled="False" x:Name="ProgressRing1"/>■(3)
            <TextBlock x:Name="recordTextBlock" HorizontalAlignment="Left" Height="47" Margin="550,-220,29,237" TextWrapping="Wrap" Text="録音中……" VerticalAlignment="Top" Width="181" FontFamily="Meiryo UI" FontSize="24" FontWeight="Bold" Foreground="Crimson"  Visibility="Collapsed"/>■(3)
        </StackPanel>■(2)
        <ComboBox x:Name="cameraComboBox" HorizontalAlignment="Left" Height="54" Margin="200,186,0,0" VerticalAlignment="Top" Width="332"/>■(4)
        <CaptureElement x:Name="CaptureElement1" HorizontalAlignment="Left" Height="384" Margin="99,259,0,0" VerticalAlignment="Top" Width="512"/>■(5)
        <AppBarButton x:Name="backButton" HorizontalAlignment="Left" Height="68" Label="戻る" Margin="4,5,0,0" VerticalAlignment="Top" Width="119" Icon="Back" Visibility="Collapsed"/>■(6)
        <MediaElement x:Name="MediaElement1" HorizontalAlignment="Left" Height="37" Margin="123,490,0,0" VerticalAlignment="Top" Width="110" AutoPlay="False" Source="WAV/k1000.wav"/>■(7)
        <Frame x:Name="myFrame" HorizontalAlignment="Left" Height="686" Margin="10,82,0,0" VerticalAlignment="Top" Width="1356"/>■(8)
        <AppBar x:Name="AppBar1" Background="DarkGreen" Height="100" Margin="96,665,768,3">■(9)
            <StackPanel Orientation="Horizontal">
                <AppBarButton x:Name="shutterButton" Label="写真を撮る" Icon="Camera" />■(9)
                <AppBarButton x:Name="ichiranButton" Label="一覧" Icon="Folder" IsEnabled="False"/>■(9)
            </StackPanel>
        </AppBar>■(9)
        <TextBlock HorizontalAlignment="Left" Height="64" Margin="179,7,0,0" TextWrapping="Wrap" Text="音声付き画像日記" VerticalAlignment="Top" Width="477" FontFamily="Meiryo UI" FontSize="48" FontWeight="Bold"/>■(10)
    </Grid>
    </Viewbox>■(1)
</Page>
以上、全てをレイアウトしたのが、図6だ。
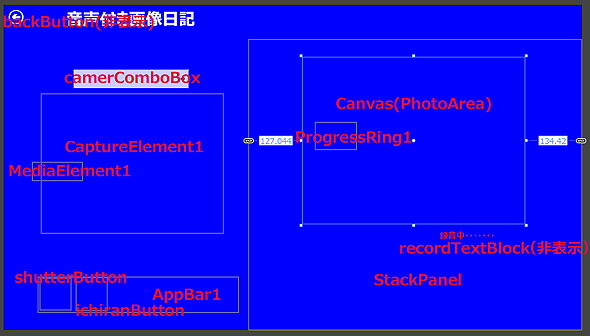 図6 各コントロールを配置した
(1)
Grid要素全体をViewbox要素で囲む。
(2)
StackPanel要素を配置する。
(3)
StackPanel要素の子要素として、名前が「PhotoArea」というCanvas要素を配置する。Widthに「640」、Heightに「480」と指定しておく。この領域にWebカメラで写した画像が追加表示される。
次に、名前が「ProgressRing1」というProgressRing要素を配置する。音声を録音している間、このプログレスリングが表示される。最初の状態では、IsActiveとIsEnabledに「False」を指定して、動作しないようにしておく。
また、「録音中……」というメッセージを表示するための、名前が「recordTextBlock」というTextBlock要素を配置する。最初の状態では非表示になっている。
(4)
名前が「cameraComboBox」という名前のComboBoxを配置する。フロントカメラやリアカメラのデバイス名が表示される。
(5)
Webカメラからの画像を表示する、「CaptureElement1」という名前のCaptureElement要素を配置する。
(6)
「backButton」という名前のAppBarButton要素を配置する。プロパティのIconに「←Back」を、Labelに「戻る」と指定する。
ただし、表示させた場合は、このLabelの値は表示させていない。backButtonは最初の状態では、非表示にしておく。
(7)
シャッター音を鳴らすために「MediaElement1」という名前のMediaElement要素を配置しておく。SourceプロパティにWAVフォルダー内の「.wavファイル」を指定しておく。
(8)
画像の一覧を表示して音声を再生するページに遷移する、名前が「myFrame」というFrame要素を配置する。
(9)
名前が「AppBar1」というAppBar要素を配置する。その子要素として、名前が「shutterButton」というAppBarButtonと、名前が「ichiranButton」というAppBarButton要素を配置する。
プロパティのIconに「Camera」「Folder」を、Labelに「写真を撮る」「一覧」と指定しておく。ichiranButtonは最初の状態では使用不可としておく。
(10)
タイトルを表示するTextBlock要素を配置する。
保存した画像の一覧と音声を再生する画面の作成(DataIchiranShowPage.xaml)
VS 2013のメニューから、[プロジェクト(P)]→[新しい項目の追加(W)]と選択し、表示される「新しい項目の追加」画面で、左のWindows ストアを選択し、右の欄から「空白のページ」を選択する。「名前(N)」には「DataIchiranShowPage.xaml」と指定し、[追加(A)]ボタンをクリックする。
「DataIchiranShowPage.xaml」は保存した画像の一覧と音声を再生するページだ。
ツールボックスからデザイン画面上にコントロールをレイアウトする。書き出され編集されたXAMLはリスト2のようになる。
<Page
    x:Class="ImageVoiceRecorde.DataIchiranShowPage"
    xmlns="http://schemas.microsoft.com/winfx/2006/xaml/presentation"
    xmlns:x="http://schemas.microsoft.com/winfx/2006/xaml"
    xmlns:local="using:ImageVoiceRecorde"
    xmlns:d="http://schemas.microsoft.com/expression/blend/2008"
    xmlns:mc="http://schemas.openxmlformats.org/markup-compatibility/2006"
    mc:Ignorable="d">
    <Viewbox>■(1)
        <Grid Background="Blue" Width="1514" Margin="0,-14,0,0" Height="867" >
        <Image x:Name="Image1" HorizontalAlignment="Left" Height="480" Margin="388,26,0,0" VerticalAlignment="Top" Width="640"/>■(2)
        <ScrollViewer HorizontalAlignment="Left" Height="239" Margin="10,519,0,0" VerticalAlignment="Top" Width="1494">■(3)
            <GridView Height="208" Width="1465" x:Name="GridView1" FlowDirection="LeftToRight" />■(3)
        </ScrollViewer>■(3)
        <AppBar Height="100" Margin="10,668,-7,0"  x:Name="ichiranAppBar" Background="Navy" VerticalAlignment="Bottom">■(4)
            <StackPanel Orientation="Horizontal">■(4)
                 <AppBarButton x:Name="playButton" Label="再生" Icon="Play" Height="111" Width="120"/>■(4)
                    <AppBarButton x:Name="pauseButton" Icon="Pause" Label="休止" IsEnabled="False" Height="110" Width="128"/>■(4)
                    <AppBarButton x:Name="stopButton" Icon="Stop" Label="停止" IsEnabled="False" Height="111" Width="128"/>■(4)
                    <AppBarButton x:Name="deleteButton" Icon="Delete" Label="削除" IsEnabled="False" Height="106" Width="131"/>■(4)
            </StackPanel>■(4)
        </AppBar>■(4)
        <MediaElement HorizontalAlignment="Left" Height="41" Margin="22,449,0,0" VerticalAlignment="Top" Width="142" x:Name="MediaElement1" AutoPlay="False"/>■(5)
        <ProgressRing HorizontalAlignment="Left" Height="117" Margin="619,373,0,0" VerticalAlignment="Top" Width="139" x:Name="ProgressRing1" IsActive="False" IsEnabled="False"/>■(6)
        <TextBlock x:Name="fileNameTextBlock" HorizontalAlignment="Left" Height="52" Margin="22,41,0,0" TextWrapping="Wrap" VerticalAlignment="Top" Width="333" FontFamily="Meiryo UI" FontSize="20" Foreground="Gold" FontWeight="Bold"/>■(7)
        <TextBlock x:Name="playMsgTextBlock" Text="再生中……" HorizontalAlignment="Left" Height="52" Margin="22,98,0,0" TextWrapping="Wrap" VerticalAlignment="Top" Width="333" FontFamily="Meiryo UI" FontSize="36" Foreground="Crimson" FontWeight="Bold" Visibility="Collapsed"/>■(8)
    </Grid>
    </Viewbox>■(1)
</Page>
以上、全てをレイアウトしたのが図7だ。
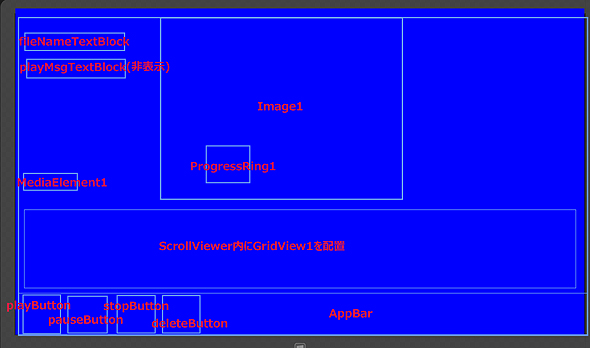 図7 各コントロールを配置した
(1)
背景色がBlueのGrid要素全体をViewbox要素で囲む。
(2)
「Image1」という名前のImage要素を配置し、Widthに「640」、Heightに「480」と指定する。
(3)
ScrollViewer要素を配置し、その子要素として「GridView1」という名前のGridView要素を配置する。
(4)
AppBar要素を配置し、子要素としてStackPanel要素を配置し、Orientationプロパティで、オブジェクトのスタック方向を水平方向とするHorizontalを指定する。
StackPanel要素の子要素として、4つのAppBarButton要素を以下の表のように配置する。
| 名前 | プロパティのSymbol | プロパティのLabel |
|---|---|---|
| playButton | Play | 再生 |
| pauseButton | Pause | 休止 |
| stopButton | Stop | 停止 |
| deleteButton | Delete | 削除 |
(5)
音声を再生する、「MediaElement1」という名前のMediaElement要素を配置する。
(6)
音声が再生されている間表示される、「ProgressRing1」という名前のProgressRing要素を配置する。最初は動作不可としておく。
(7)
ファイル名を表示する、「fileNameTextBlock」というTextBlock要素を配置する。
(8)
「再生中……」と表示する、「playMsgTextBlock」というTextBlock要素を配置する。最初は非表示にしておく。
Copyright © ITmedia, Inc. All Rights Reserved.


![]() ITmediaはアイティメディア株式会社の登録商標です。
ITmediaはアイティメディア株式会社の登録商標です。