Android 2.1の新機能「Live Wallpaper」で作る、美しく燃える“待ち受け”:Androidで動く携帯Javaアプリ作成入門(14)(2/3 ページ)
» 2010年02月24日 00時00分 公開
[緒方聡,株式会社イーフロー]
ちょっと、てこずる? Live Wallpaperの設定
それでは、必要な設定ファイル(XML)を1つずつ説明していきます。
<?xml version="1.0" encoding="utf-8"?>
<manifest
    xmlns:android="http://schemas.android.com/apk/res/android"
    package="com.example.android.livewallpaper">
  <application
      android:label="@string/wallpaper_name"
      android:icon="@drawable/thumbnail">
    <service
        android:name=".FireWallpaperService"
        android:label="@string/wallpaper_name"
        android:permission="android.permission.BIND_WALLPAPER">       <!--【1】-->
      <intent-filter>
        <action
            android:name="android.service.wallpaper.WallpaperService" /> <!--【2】-->
      </intent-filter>
      <meta-data				<!--【3】-->
        android:name="android.service.wallpaper"
        android:resource="@xml/wallpaper" />
    </service>
    <activity					<!--【4】-->
        android:label="@string/wallpaper_settings"
        android:name=".FireWallpaperSettings"
        android:theme="@android:style/Theme.Light.WallpaperSettings"
        android:exported="true">
    </activity>
  </application>
</manifest>
AndroidManifest.xml
- 【1】WallpaperServiceはサービスとして登録し、その際、パーミッションに「android:permission="android.permission.BIND_WALLPAPER"」が必要
- 【2】登録したServiceのintent-filterには、「<action android:name="android.service.wallpaper.WallpaperService" />」を設定する必要がある
- 【3】meta-dataでLive Wallpaperのリソースを定義。これはres/xml/に作成
- 【4】もし、Live Wallpaperに設定項目が必要なら、activityを登録。activityを登録すると、以下のようにサンプル画面で設定ボタンが表示される
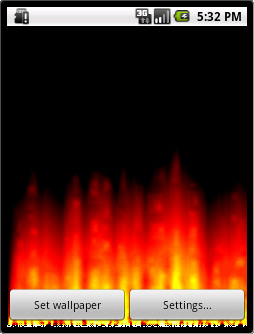 図1 Live Wallpaperの設定ボタン
<?xml version="1.0" encoding="utf-8"?>
<wallpaper					<!--【5】-->
  xmlns:android="http://schemas.android.com/apk/res/android"
  android:thumbnail="@drawable/thumbnail"					<!--【6】-->
  android:description="@string/description"					<!--【7】-->
  android:settingsActivity="com.example.android.livewallpaper.FireWallpaperSettings" /> <!--【8】-->
res/xml/<任意>.xml
- 【5】Live WallpaperのXMLリソースを定義。このリソース定義で【6】サムネイル、【7】説明を定義すると、以下のようにLive Wallpaper起動画面に反映される
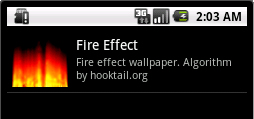 図2 Live Wallpaper起動画面
- 【8】設定画面はここで、FQCNで指定する必要がある
<?xml version="1.0" encoding="utf-8"?>
<PreferenceScreen					<!--【9】-->
    xmlns:android="http://schemas.android.com/apk/res/android"
    android:title="@string/settings">
  <ListPreference
      android:key="@string/preference_key"         <!--【10】-->
      android:title="@string/settings_title"       <!--【11】-->
      android:summary="@string/settings_summary"   <!--【12】-->
      android:entries="@array/entries"             <!--【13】-->
      android:entryValues="@array/values" />       <!--【14】-->
</PreferenceScreen>
res/xml/<任意>.xml
- 【9】PreferenceActivityのリソース定義ファイルもXMLで定義
- 【10】設定項目のキー、【11】タイトル、【12】説明、【13】項目、【14】項目に対する値を設定。今回は複数の候補から1つを選択させたいので、ListPreferenceを使用したが、目的に応じて設定を変更してほしい
<?xml version="1.0" encoding="utf-8"?>
<resources xmlns:android="http://schemas.android.com/apk/res/android">  <!--【15】-->
  <string-array name="entries">					<!--【16】-->
    <item>Strong</item>
    <item>Middle</item>
    <item>Low</item>
  </string-array>
  <string-array name="values">					<!--【17】-->
    <item>60</item>
    <item>120</item>
    <item>150</item>
  </string-array>
</resources>
res/values/<任意>.xml
- 【15】ListPreferenceのリスト内容をXML定義ファイルとして切り離している
- 【16】string-arrayでリスト項目を定義し、【17】同じくstring-arrayで項目に対する値を定義。項目の値は数値だが、integer-arrayは使用できない。プログラム側で文字列として取得し、Integer.parseInt(String)で数値に変換する必要がある
設定画面は下記のようなイメージです。
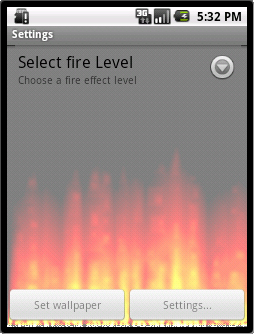 図3 Live Wallpaper設定画面1
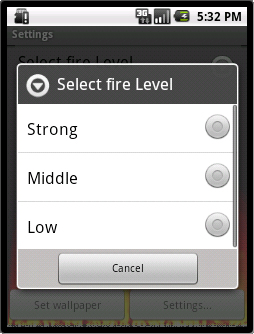 図4 Live Wallpaper設定画面2
また、設定項目は、壁紙選択のトップ画面からも呼び出しできるようになります。
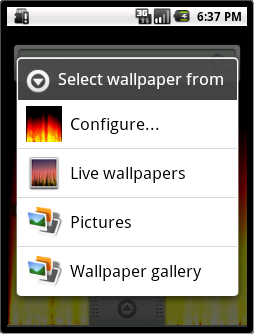 図5 壁紙選択のトップ画面からも呼び出し
次ページでは、Live Wallpaperの実装を見てみましょう。
Copyright © ITmedia, Inc. All Rights Reserved.


![]() ITmediaはアイティメディア株式会社の登録商標です。
ITmediaはアイティメディア株式会社の登録商標です。